hyb8nate
Intelligent Kubernetes deployment hibernation scheduler
All-in-one service to automatically hibernate (scale to 0) your Kubernetes deployments based on time schedules.
🎯 Overview
hyb8nate (pronounced "hibernate") is a Kubernetes-native application that automatically scales down your deployments during off-hours and scales them back up when needed. Save resources, reduce costs, and optimize your cluster utilization without manual intervention.
Perfect for:
- 🌙 Development/staging environments during night hours
- 🏖️ Non-production workloads during weekends
- 💰 Cost optimization on cloud providers
- 🔋 Energy-efficient cluster management
✨ Features
🕐 Flexible Scheduling
- Time-based scaling: Define custom scale-down and scale-up times (HH:MM format)
- Timezone support: Configure schedules in your local timezone (e.g.,
Europe/Paris,US/Central) - Preset templates: Quick setup with common patterns (night, lunch break, evening)
- Minute-precise execution: Schedules execute at exactly HH:MM:00
🔒 Security & Control
- Namespace labeling: Only namespaces with
hyb8nate.xyz/enabled=truelabel can be scheduled - Per-deployment control: Enable/disable schedules individually
- Conflict detection: Prevents duplicate schedules for the same deployment
- State restoration: Automatically restores original replica count
- Smart enable/disable: Scales deployments intelligently when toggling schedules
🎨 Modern UI
- Real-time dashboard: Monitor all schedules at a glance
- Easy management: Create, edit, and delete schedules with a clean interface
- Status tracking: See which deployments are currently hibernated
- Responsive design: Works on desktop, tablet, and mobile
🚀 Production Ready
- All-in-one deployment: Single Docker image with backend + frontend
- In-cluster execution: Runs directly in your Kubernetes cluster
- SQLite backend: Simple, reliable, no external database needed
- Persistent storage: Survives pod restarts with PersistentVolume
- Health checks: Built-in liveness and readiness probes
- Minimal permissions: RBAC with least privilege principle
- Multi-architecture: Supports AMD64 and ARM64
💤 Automatic snooze labels
- FluxCD & ArgoCD: sync snooze labels added automatically if needed
🏗️ Architecture
┌────────────────────────────────────────────────────────┐
│                    Kubernetes Cluster                  │
│                                                        │
│  ┌────────────────────────────────────────────────┐    │
│  │              hyb8nate Pod                      │    │
│  │                                                │    │
│  │  ┌──────────────┐        ┌─────────────────┐   │    │
│  │  │   FastAPI    │◄──────►│   React SPA     │   │    │
│  │  │   Backend    │        │   Frontend      │   │    │
│  │  └──────┬───────┘        └─────────────────┘   │    │
│  │         │                                      │    │
│  │         ├─────────► SQLite Database            │    │
│  │         │            (PersistentVolume)        │    │
│  │         │                                      │    │
│  │  ┌──────▼────────┐                             │    │
│  │  │  Scheduler    │                             │    │
│  │  │  (APScheduler)│                             │    │
│  │  └──────┬────────┘                             │    │
│  └─────────┼──────────────────────────────────────┘    │
│            │                                           │
│            ▼                                           │
│  ┌─────────────────────────────────────────────┐       │
│  │        Kubernetes API Server                │       │
│  │  (Scale Deployments via Apps/v1 API)        │       │
│  └─────────────────────────────────────────────┘       │
│                                                        │
└────────────────────────────────────────────────────────┘
Technology Stack:
- Backend: Python 3.13 + FastAPI + APScheduler
- Frontend: React + TypeScript + Tailwind CSS
- Database: SQLite (embedded, no external DB needed)
- Kubernetes Client: Official Python kubernetes client
- Container: All-in-one Docker image (backend serves static frontend)
🚀 Quick Start
Prerequisites
- Kubernetes cluster (v1.21+)
kubectlconfigured to access your cluster- Cluster-admin permissions (for initial RBAC setup)
1. Label your namespaces
Only namespaces with the label hyb8nate.xyz/enabled=true can create schedules:
kubectl label namespace my-dev-namespace hyb8nate.xyz/enabled=true
kubectl label namespace my-staging-namespace hyb8nate.xyz/enabled=true
2. Deploy hyb8nate
kubectl apply -f https://raw.githubusercontent.com/hyb8nate/hyb8nate/main/k8s/all-in-one.yaml
3. Access the UI
# Port forward to access locally
kubectl port-forward -n hyb8nate svc/hyb8nate 8000:8000
Open your browser at: http://localhost:8000
Default login password: admin (⚠️ change it via ADMIN_PASSWORD environment variable)
4. Create your first schedule
- Select a namespace and deployment
- Set scale-down and scale-up times
- Click "Create Schedule"
- Done! Your deployment will automatically hibernate at the scheduled time
📦 Installation
Option 1: All-in-One Manifest (Recommended)
Deploy everything with a single command:
kubectl apply -f https://raw.githubusercontent.com/hyb8nate/hyb8nate/main/k8s/all-in-one.yaml
This creates:
hyb8natenamespace- ServiceAccount with RBAC permissions
- PersistentVolumeClaim (1Gi for SQLite database)
- Deployment (all-in-one image)
- ClusterIP Service
- (Optional) Ingress
Option 3: Helm Chart (Coming Soon)
helm repo add hyb8nate https://hyb8nate.github.io/charts
helm install hyb8nate hyb8nate/hyb8nate \
  --set admin.password=your-secure-password \
  --set timezone=Europe/Paris
⚙️ Configuration
Environment Variables
| Variable | Description | Default | Required |
|---|---|---|---|
ADMIN_PASSWORD |
Admin login password | admin |
❌ |
JWT_SECRET_KEY |
Secret key for JWT tokens | Auto-generated | ❌ |
ACCESS_TOKEN_EXPIRE_MINUTES |
JWT token expiration (minutes) | 30 |
❌ |
TIMEZONE |
Timezone for schedules | Europe/Paris |
❌ |
LOG_LEVEL |
Logging level (DEBUG, INFO, WARNING, ERROR) | INFO |
❌ |
FLUXCD_OPTION |
Snooze label to avoid FluxCD sync | false |
❌ |
ARGOCD_OPTION |
Snooze label to avoid ArgoCD sync | false |
❌ |
Example Configuration
apiVersion: v1
kind: Secret
metadata:
  name: hyb8nate-secret
  namespace: hyb8nate
type: Opaque
stringData:
  admin-password: "your-secure-password"
---
apiVersion: v1
kind: ConfigMap
metadata:
  name: hyb8nate-config
  namespace: hyb8nate
data:
  TIMEZONE: "America/New_York"
  LOG_LEVEL: "INFO"
Kubernetes Resources
Minimum requirements:
- CPU: 100m (requests), 300m (limits)
- Memory: 128Mi (requests), 256Mi (limits)
- Storage: 100M PersistentVolume for SQLite database
RBAC Permissions (read-only except for deployments):
rules:
  - apiGroups: [""]
    resources: ["namespaces"]
    verbs: ["get", "list"]
  - apiGroups: ["apps"]
    resources: ["deployments"]
    verbs: ["get", "list", "patch"]
📘 Usage
1. Enable Scheduling for a Namespace
Label the namespace to allow hyb8nate to manage its deployments:
kubectl label namespace my-app hyb8nate.xyz/enabled=true
You can also customize the label key/value via environment variables.
2. Create a Schedule
Via the UI:
- Open hyb8nate in your browser
- Click "New Schedule" button
- Select namespace from dropdown (only labeled namespaces appear)
- Select deployment from dropdown
- Set scale-down time (e.g.,
22:00for 10 PM) - Set scale-up time (e.g.,
08:00for 8 AM) - Click "Create Schedule"
Via API:
# 1. Login to get token
curl -X POST http://localhost:8000/api/auth/login \
  -H "Content-Type: application/json" \
  -d '{"password": "admin"}'

# 2. Create schedule (use the token from step 1)
curl -X POST http://localhost:8000/api/schedules \
  -H "Authorization: Bearer YOUR_TOKEN" \
  -H "Content-Type: application/json" \
  -d '{
    "namespace": "my-app",
    "deployment_name": "my-deployment",
    "scale_down_time": "22:00",
    "scale_up_time": "08:00"
  }'
3. Monitor Schedules
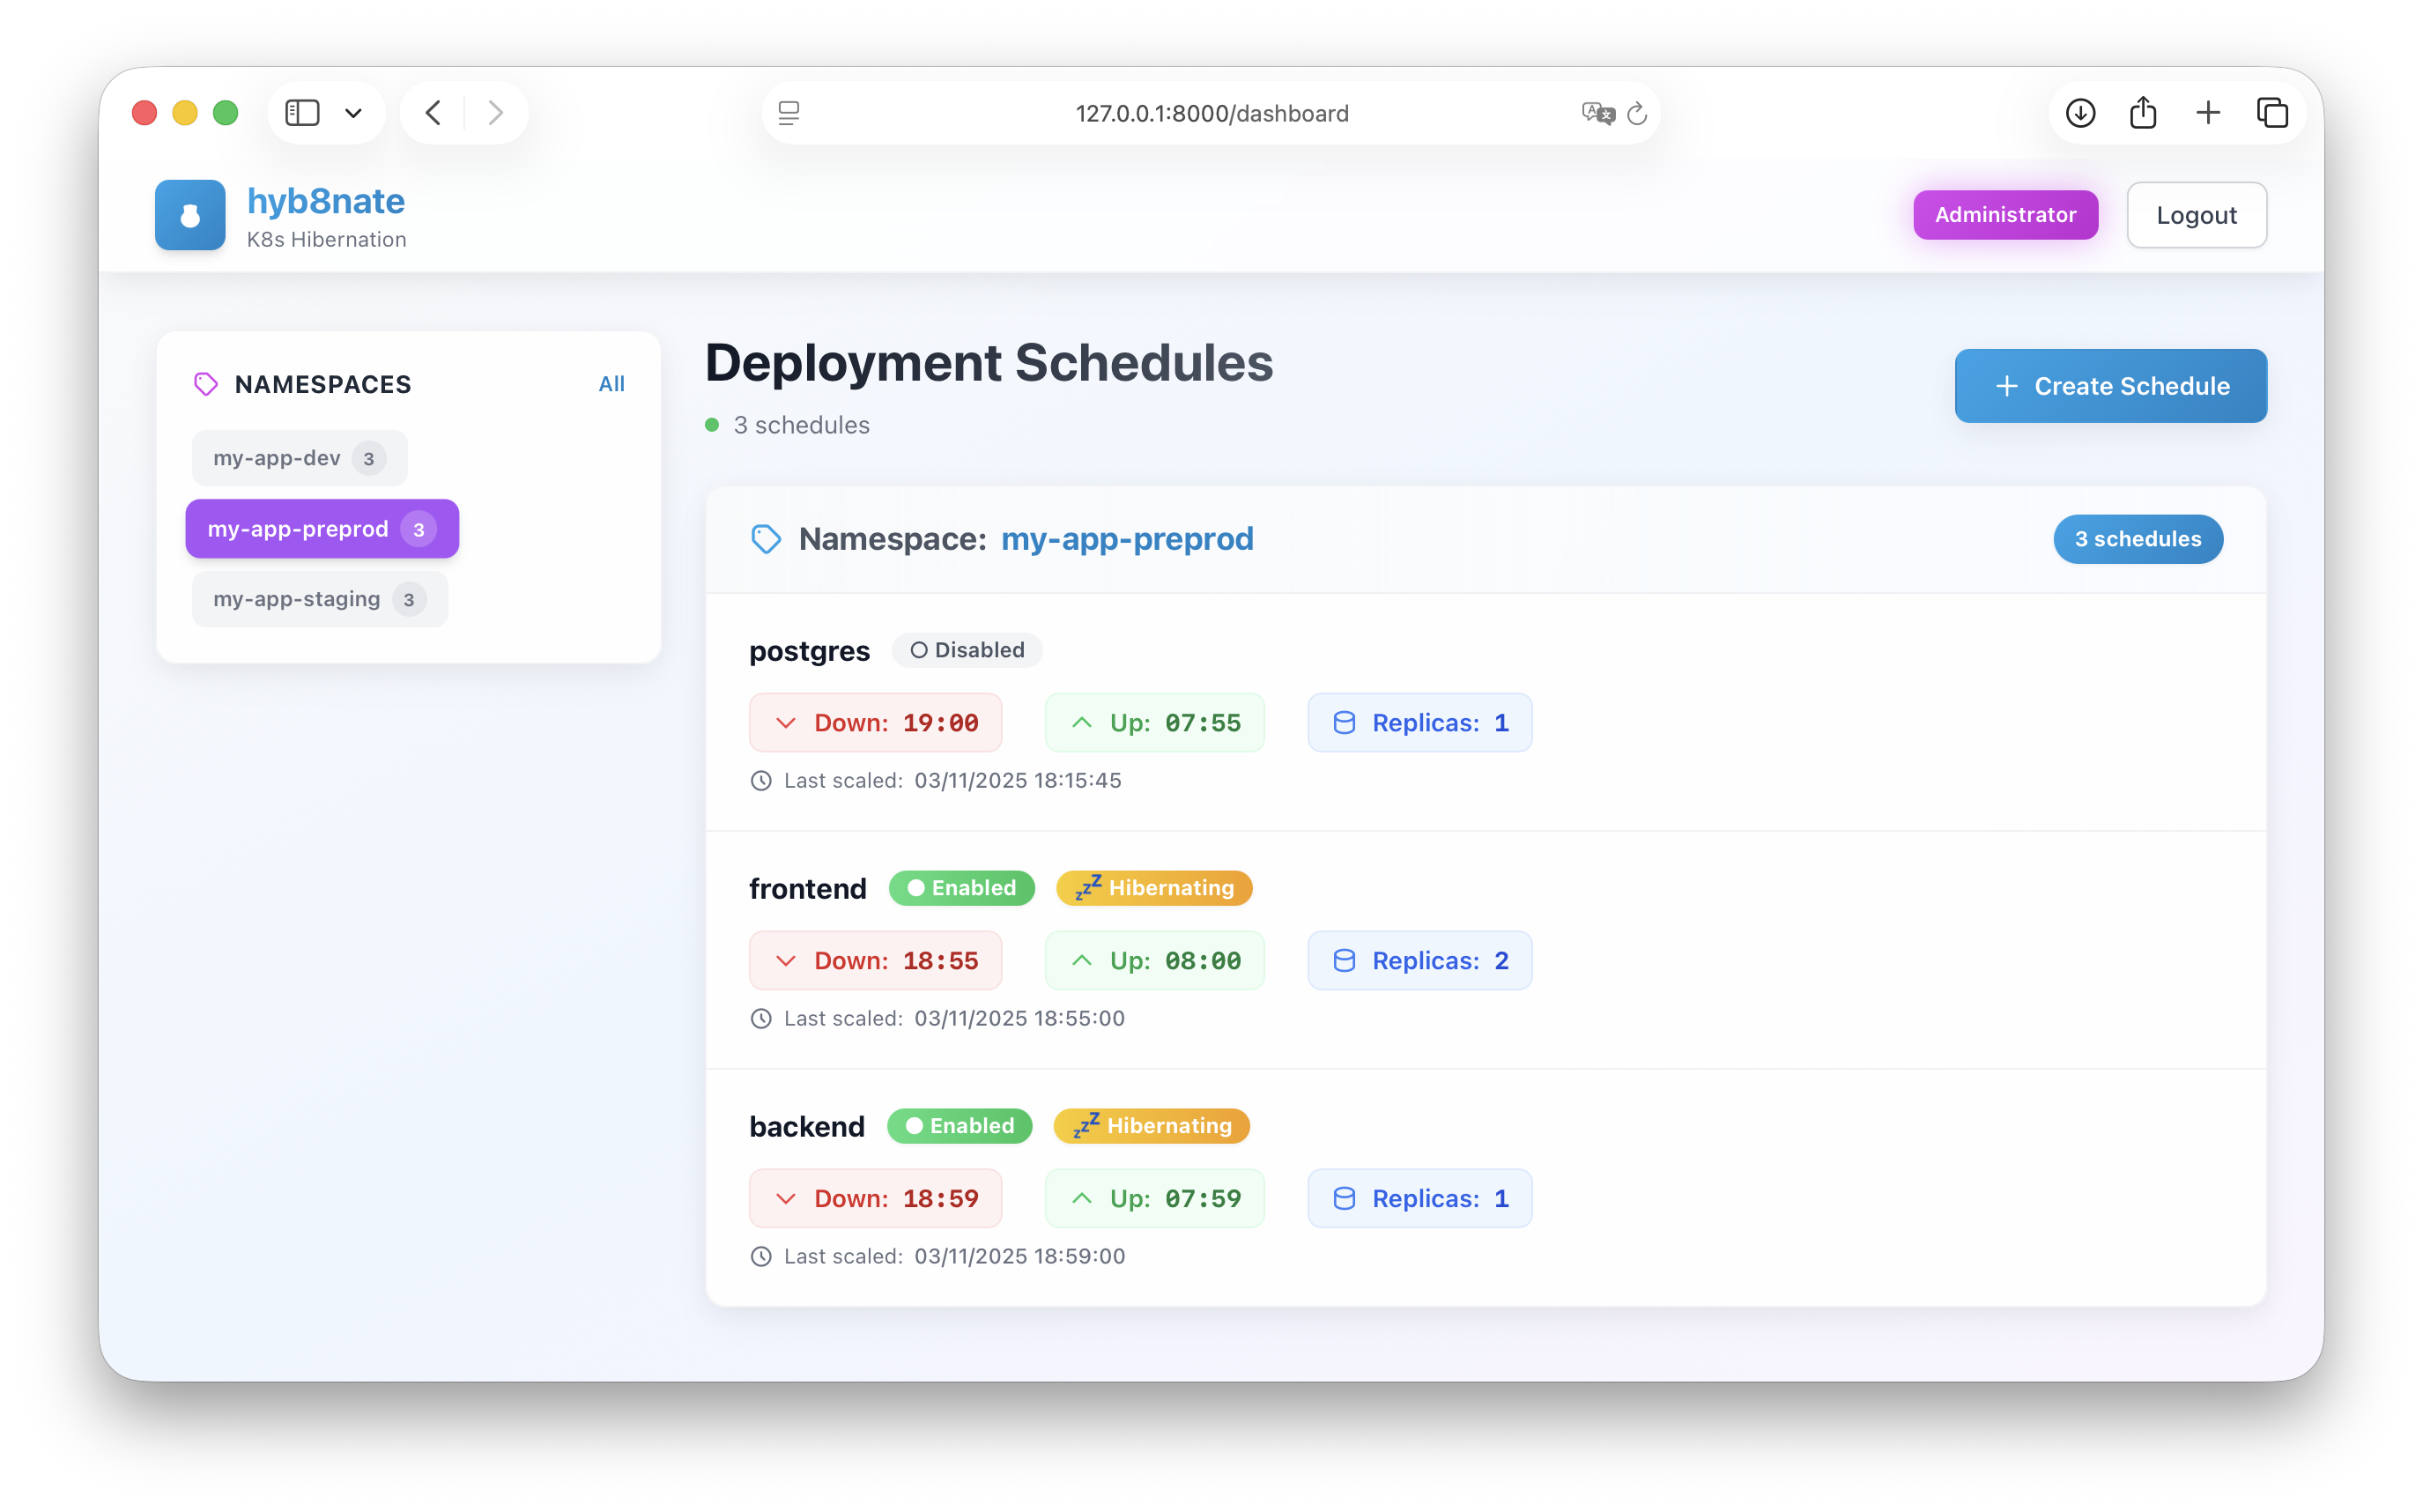
Dashboard View:
- Green badge: Schedule is enabled
- Red badge: Schedule is disabled
- "Currently scaled down" indicator: Deployment is hibernated
Via API:
curl http://localhost:8000/api/schedules \
  -H "Authorization: Bearer YOUR_TOKEN"
4. Edit a Schedule
- Via UI: Click the edit icon (✏️) next to the schedule
- Via API: Send a PATCH request to
/api/schedules/{id}
Smart behavior:
- If you disable a schedule that's currently hibernated, it scales back up immediately
- If you enable a schedule during hibernation period, it scales down immediately
5. Delete a Schedule
When you delete a schedule, hyb8nate automatically scales the deployment back to its original replica count if it's currently hibernated.
🔍 How It Works
- Schedule Creation: When you create a schedule, hyb8nate saves the current replica count
- Periodic Check: APScheduler checks every minute if any schedule should trigger
- Scale Down: At scale-down time, deployment is scaled to 0 replicas
- Scale Up: At scale-up time, deployment is restored to original replica count
- State Persistence: All state is saved in SQLite database (survives restarts)
- Timezone Aware: All times are interpreted in the configured timezone
Example Timeline
Schedule: Scale down at 22:00, Scale up at 08:00 (timezone: Europe/Paris)
07:00 ────► ✅ Deployment running (3 replicas)
22:00 ────► 🌙 Scaled down to 0 replicas (hibernation starts)
23:30 ────► 💤 Still hibernated (0 replicas)
08:00 ────► ☀️ Scaled up to 3 replicas (back to normal)
10:00 ────► ✅ Running normally (3 replicas)
🔧 Development
Local Development
Prerequisites:
- Python 3.13+
- Node.js 22+
- uv (Python package manager)
- Access to a Kubernetes cluster (for testing)
Backend:
cd backend
uv sync
uv run python main.py
# API available at http://localhost:8000
# Swagger docs at http://localhost:8000/api/docs
Frontend:
cd frontend
npm install
npm run dev
# UI available at http://localhost:5173
Build Docker image:
docker build -t hyb8nate:dev .
🛠️ Troubleshooting
Schedule not triggering
Check scheduler is running:
kubectl logs -n hyb8nate -l app=hyb8nate -f | grep "Scheduler started"
Check schedule exists and is enabled:
curl http://localhost:8000/api/schedules \
  -H "Authorization: Bearer YOUR_TOKEN"
Check timezone configuration:
kubectl get deployment -n hyb8nate hyb8nate -o jsonpath='{.spec.template.spec.containers[0].env[?(@.name=="TIMEZONE")].value}'
Permission denied errors
Check RBAC permissions:
kubectl auth can-i get deployments --as=system:serviceaccount:hyb8nate:hyb8nate -n my-namespace
kubectl auth can-i patch deployments --as=system:serviceaccount:hyb8nate:hyb8nate -n my-namespace
Namespace not appearing in dropdown
Check namespace has required label:
kubectl get namespace my-namespace -o jsonpath='{.metadata.labels.hyb8nate\.xyz/enabled}'
# Should output: true
Add label if missing:
kubectl label namespace my-namespace hyb8nate.xyz/enabled=true
Database corrupted
Reset database (⚠️ this deletes all schedules):
kubectl delete pvc -n hyb8nate hyb8nate-data
kubectl delete pod -n hyb8nate -l app=hyb8nate
🤝 Contributing
Contributions are welcome! Please feel free to submit a Pull Request.
- Clone the repository
- Create your feature branch (
git checkout -b dev-feature/amazing-feature) - Commit your changes (
git commit -m 'feat: some amazing feature') - Push to the branch (
git push origin dev-feature/amazing-feature) - Open a Pull Request
📝 License
This project is licensed under the MIT License - see the LICENSE file for details.
🙏 Acknowledgments
- Built with FastAPI and React
- Kubernetes client library by Kubernetes
- Scheduling powered by APScheduler
- UI components inspired by Tailwind UI